


What You Need to Know Before Building
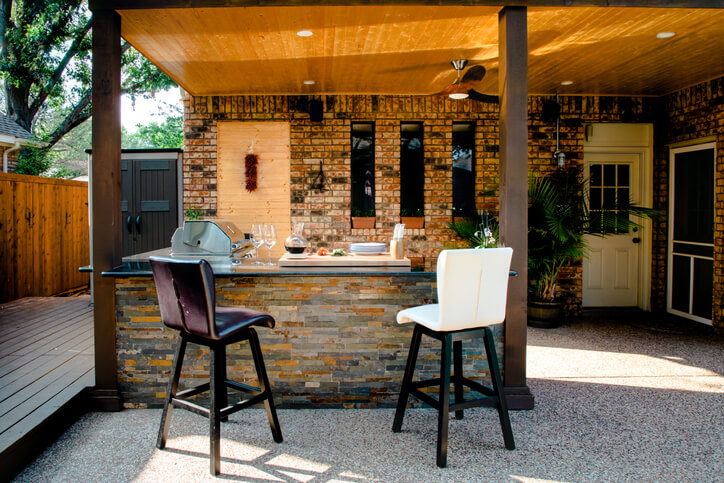
An outdoor kitchen looks simple on the surface, but once you add a sink, built-in appliances, lighting, or a covered cooking area, you are dealing with real utilities. Gas lines need correct sizing. Water needs a drainage plan and freeze protection. Electrical work requires weather-rated materials and properly installed circuits. Ventilation depends on where and how you are cooking.
This guide walks through the basics of utility planning in a technical yet homeowner-friendly way, so you can make informed decisions before construction starts.
Why Utilities Should Be Planned Before Design Is Final
Outdoor kitchens are easiest to build when everything that runs below or behind the structure is planned upfront. Once pavers are laid and the island is built, adding a new gas line or conduit run usually means tearing up the work and doing it twice.
- Place the kitchen where utilities can realistically reach it
- Avoid undersized gas lines or overloaded electrical circuits
- Choose appliances that match your site conditions
- Build in future flexibility without major rework
Step One: Make a Utility List Based on What You Are Installing
Start by listing every item you want in the outdoor kitchen now, then add a short “future upgrades” list. Each appliance or feature typically needs one or more of the following: gas, water, drain, electricity, and ventilation.
- Gas grill, side burner, pizza oven, fire feature
- Sink and faucet, prep sink, pot filler
- Outdoor refrigerator, fridge drawers, freezer, kegerator
- Ice maker or beverage center with a water line
- Dishwasher
- Lighting, outlets, USB charging, ceiling fans
- Speakers, TV, Wi-Fi, or low-voltage controls
- Vent hood or exhaust fan
Even if you are not installing everything on day one, it can still be smart to rough in a capped gas stub, a drain line, or an extra conduit run while the site is open.
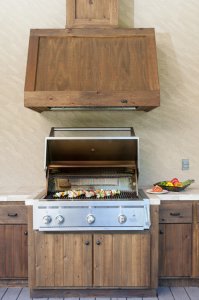
Gas Lines: What Homeowners Should Know Before Choosing Appliances
Gas is often the first utility to plan because it affects both appliance selection and kitchen placement.
Natural Gas vs. Propane
Natural gas
- Runs from your home’s gas supply through a permanent line
- No tanks to swap or refill
- Requires professional installation and correct line sizing
- May require checking the gas meter capacity, depending on the total BTU load
Propane
- Uses a tank stored in a ventilated cabinet or a nearby location
- It can be practical when the kitchen is far from the house
- Requires a safe storage approach and easy access for refills or swaps
- Appliance must be built for propane or properly converted per the manufacturer’s rules
If your home already has natural gas, many homeowners choose it for convenience. Propane is common when natural gas is not available or when the layout makes a long gas run impractical.
Why Gas Line Sizing Matters
Gas appliances are rated by BTUs. If the line is undersized, you can see low flame output or inconsistent performance, especially when multiple appliances run at once.
- Total BTUs of all gas appliances
- Distance from the source to the outdoor kitchen
- Pipe diameter and allowable pressure drop
- Whether appliances can be used simultaneously
If you think you may add a side burner or fire feature later, mention it early. It is often easier to size the system for future demand than to redo the line later.
Shutoff valves and access
A safe setup includes an accessible shutoff valve. You also want the connection point inside the island to be reachable without removing stone or cabinetry. Access panels are not only helpful but also often necessary for service.
Clearances and safe placement
- Overhangs, pergolas, or patio roofs
- Nearby siding, windows, and doors
- Cabinet interiors and framing materials
- The manufacturer’s stated clearance requirements
Water Supply: Sinks, Ice Makers, and What Freeze Risk Changes
Adding water to an outdoor kitchen makes it more functional, but it also adds extra planning requirements.
- Cold water supply line
- Shutoff valve in an accessible, protected location
- Drain line to an approved discharge point
- A winterization plan
Hot water is optional. It can be convenient for washing hands and cleaning cookware, but it adds complexity, especially in climates that freeze.
- Extending a hot water line from inside the home
- Installing a point-of-use water heater near the outdoor kitchen
If your outdoor kitchen is used mostly in warm months and you mainly need water for rinsing, cold-only is often enough. If you cook outside often and want true cleanup capability, hot water may be worth planning for.
Drainage: where projects get complicated
Drainage is not the same everywhere. Many areas do not allow outdoor sink drains to empty onto the yard. In many cases, the drain must tie into a sanitary sewer connection or another approved system.
- What type of drain connection is allowed locally
- Whether a pump is needed based on slope and distance
- How the drain will be protected and accessed for maintenance
This is a key planning step. Do not assume drainage is simple until a professional confirms the route and compliance requirements.
Freeze protection and winterization
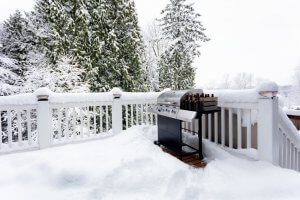
- Running lines below frost depth
- Insulating and sleeving exposed sections
- Installing shutoffs inside the home, plus drain-down points
- Seasonal blow-out procedures for supply lines, if required
Ask for a straightforward winterization plan that tells you exactly what you will need to do each fall.
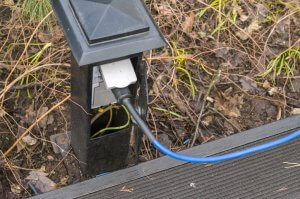
Electricity: Circuits, Outdoor Safety Requirements, and Real-World Power Needs
Outdoor electrical work is not just about adding an outlet. Built-in appliances and lighting often require multiple circuits, weather-rated materials, and specific safety protections.
GFCI protection and weather-rated components
- GFCI protection to reduce shock risk
- Weather-resistant outlets
- In-use outlet covers
Correctly rated boxes, conduit, and fittings
Outdoor-rated components are designed to handle moisture and temperature swings. Indoor-rated materials do not hold up the same way.
Understanding circuit needs
- Outdoor refrigerator
- Ice maker
- Vent hood or powered exhaust fan
- Dishwasher
- Electric pizza ovens or specialty appliances
Lighting and general outlets are often on separate circuits for reliability. Your electrician will calculate the total load and confirm whether your existing panel can support the additional circuits. In some cases, a subpanel is installed closer to the outdoor kitchen to simplify wiring.
Outlet placement that matches how you will use the space
- Prep areas for small appliances
- Seating or bar areas for charging devices
- Enclosed storage spaces for powered accessories
- Walls or structures for TVs, speakers, heaters, or fans
Even if you do not install every feature now, adding extra conduit pathways can make future upgrades far easier.
Low-voltage and “nice to have” features
- Accent lighting
- Speakers
- TV wiring
- Smart controls for lighting zones
- Wi-Fi access points
These features are easiest to plan while walls and bases are still open.
Ventilation: When You Need It and How to Plan for It
Ventilation is often overlooked, but it matters when your cooking area is covered or partially enclosed.
Do you need an outdoor vent hood?
If your grill is in a fully open-air setup, ventilation may be optional. If your grill is under a roof, a pergola with a solid top, or near walls, smoke and heat can collect, and grease residue can build up on surfaces.
- How enclosed the space is
- The grill’s output and cooking style
- Manufacturer requirements for clearances and ventilation
- Local code requirements for covered cooking areas
- Outdoor vent hoods are not the same as indoor hoods
- Confirming the correct hood size for the grill
- Planning a safe duct route to discharge air
- Supplying power for the fan and hood lighting
- Ensuring materials around the grill zone meet clearance and safety requirements
If your outdoor kitchen is part of a structure with walls, screens, or wind-blocking panels, your contractor should confirm whether additional ventilation rules apply.
Permits and Inspections: What to Expect
Many outdoor kitchen utility components require permits. Requirements vary, but gas, plumbing, electrical, and structural work often trigger inspections.
- New gas lines
- New electrical circuits or subpanels
- Plumbing supply and drain connections
- New roof structures, pavilions, or enclosures
- Who is pulling permits, the contractor or the homeowner?
- What inspections will be required and when?
- Will installation follow the manufacturer’s specs for every appliance?
Permits are not just paperwork. They help confirm that the work meets minimum safety standards.
Pre-Build Checklist: What You Should Decide Before Construction Starts
- Which appliances and features are included now?
- What upgrades might you add later?
- Is the cooking zone covered, partially covered, or open-air?
- Natural gas or propane?
- Total BTU demand confirmed?
- Gas line sizing and shutoff location planned?
- Safe clearances and access panels included?
- Cold-only or hot and cold?
- Drainage path confirmed and compliant?
- Is the winterization method defined and manageable?
- Dedicated circuits needed for appliances and ventilation?
- GFCI outlets and weather-rated materials specified?
- Lighting zones, speakers, TV, and controls planned?
- Conduit included for future additions?
- Hood required based on coverage and grill type?
- Ducting route and power supply planned?
- Heat clearances confirmed for the structure?
A Smooth Build Starts With Utility Planning
Outdoor kitchens work best when utilities are integrated into the design rather than treated as an afterthought. When gas, water, electricity, and ventilation are planned early, you get a kitchen that functions well, is easier to maintain, and is built with safety in mind.
If you are in the design stage now, the next practical step is to finalize your appliance list and have a licensed plumber and electrician review the plan before construction begins. That one step often prevents the most common issues homeowners run into later.
- Outdoor Kitchen Utilities 101: Gas, Water, Electricity, and Ventilation - April 1, 2026
- Material Spotlight: Concrete vs. Natural Stone vs. Brick for Outdoor Kitchens in Western PA - March 6, 2026
- How to Choose the Right Layout for Your Outdoor Kitchen: Island, L-Shape, One-Wall & More - February 27, 2026